Removing solder is an essential skill for anyone working with electronic components or PCB assembly. Whether you’re fixing a circuit, replacing a component, or cleaning up excess solder, knowing how to safely and effectively remove solder is critical. This blog will guide you through various techniques, tools, and tips for solder removal, ensuring you achieve clean and precise results.
Why Remove Solder?
Solder removal is a necessary part of electronics work for various reasons:
- Component Replacement: Removing solder is required to desolder faulty components from a PCB.
- Fixing Mistakes: Errors during PCB assembly, like solder bridges or misaligned components, need correction.
- Upgrades: Replacing outdated components with modern ones often requires desoldering.
- Rework and Prototyping: When working with PCB prototypes, adjustments and refinements are common.
Essential Tools for Solder Removal
To remove solder effectively, you need the right tools. Here are some common options:
- Soldering Iron
- A standard tool in electronics work, used for heating and melting solder.
- Essential for both applying and removing solder.
- Desoldering Pump (Solder Sucker)
- A vacuum-based tool that removes molten solder by suction.
- Great for removing solder from through-hole connections.
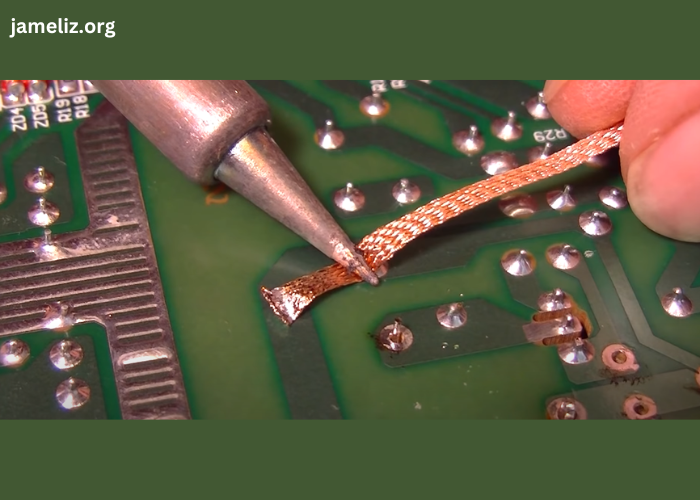
- Solder Wick (Desoldering Braid)
- A braided copper wire coated with flux.
- Absorbs molten solder, leaving a clean connection.
- Hot Air Rework Station
- A device that blows hot air to melt solder.
- Ideal for surface-mount components.
- Tweezers and Pliers
- Used to handle small components safely during the desoldering process.
- Flux
- Helps improve solder flow and makes the removal process easier.
Techniques for Solder Removal
Here are the most effective methods for removing solder, depending on the situation:
- Using a Solder Sucker
- Step 1: Heat the solder joint with a soldering iron until it melts.
- Step 2: Position the desoldering pump over the molten solder.
- Step 3: Press the pump’s button to create a vacuum and suck up the solder.
- Best For: Through-hole connections and large solder joints.
- Using Solder Wick
- Step 1: Place the solder wick over the solder joint.
- Step 2: Heat the wick with a soldering iron, allowing it to absorb the solder.
- Step 3: Remove the wick and inspect the joint. Repeat if necessary.
- Best For: Cleaning up excess solder or removing solder from small areas.
- Using a Hot Air Rework Station
- Step 1: Adjust the temperature and airflow of the station to suit the solder type.
- Step 2: Direct the hot air onto the solder joint to melt the solder.
- Step 3: Use tweezers to remove the component or a solder sucker to remove the molten solder.
- Best For: Surface-mount devices and fine-pitch components.
- Combination Method
- Use a soldering iron to melt the solder and simultaneously apply a desoldering pump or wick.
- This method provides flexibility for different solder removal scenarios.
Common Solder Removal Challenges and Solutions
- Stubborn Solder
- Problem: Some solder types, especially lead-free solder, require higher temperatures to melt.
- Solution: Use a higher-powered soldering iron or hot air rework station.
- Damaging the PCB
- Problem: Excessive heat or pressure can damage the PCB or lift pads.
- Solution: Use temperature-controlled tools and avoid applying too much force.
- Residual Solder
- Problem: Small amounts of solder remain after desoldering.
- Solution: Use a solder wick to clean up the residue and ensure a smooth surface.
- Difficulty with Small Components
- Problem: Removing solder from small or tightly packed components can be challenging.
- Solution: Use fine-tipped soldering irons and tweezers for better precision.
Tips for Successful Solder Removal
- Use Flux: Applying flux improves heat transfer and makes the solder flow better, simplifying removal.
- Maintain Tool Cleanliness: Keep the soldering iron tip and desoldering tools clean for efficient performance.
- Practice Temperature Control: Avoid overheating components or the PCB by using tools with adjustable temperature settings.
- Work in a Ventilated Area: Soldering can produce fumes; ensure good ventilation to protect your health.
- Be Patient: Desoldering requires precision. Rushing the process can damage the PCB or components.
Applications of Solder Removal
Solder removal is commonly used in various fields, including:
- PCB Manufacturing: Fixing errors or reworking boards during production.
- PCB Assembly Services: Ensuring quality during custom PCB assembly processes.
- Prototype Development: Refining designs in PCB prototype fabrication services.
- Repair and Maintenance: Extending the lifespan of electronic devices by replacing faulty components.
Conclusion
Knowing how to remove solder is an essential skill for anyone involved in electronics work, from hobbyists to professionals in PCB assembly and PCB manufacturing. With the right tools and techniques, you can efficiently remove solder, repair circuits, and refine your designs.
Whether you’re working on a prototype PCB assembly or maintaining existing electronic devices, mastering solder removal will improve the quality and reliability of your work. By following the tips and methods outlined in this guide, you’ll be well-equipped to handle any solder removal task with confidence.

